

Setting Up an Upscale Drink Station for Any Event
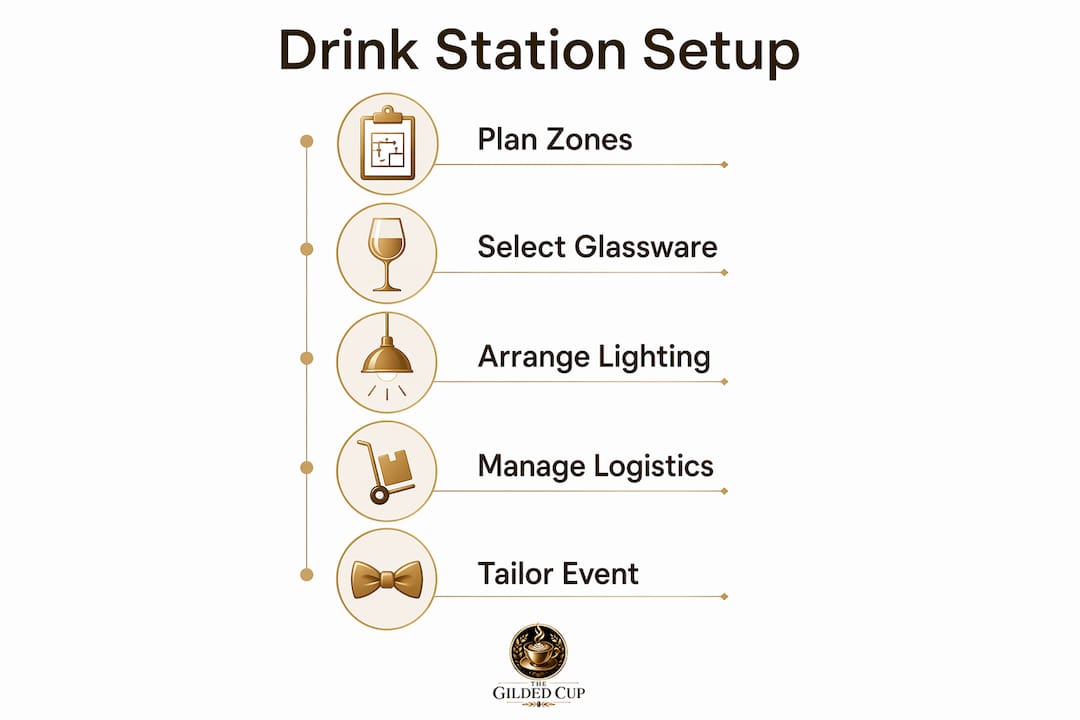
An upscale drink station is a self-serve beverage setup designed to combine elegant presentation, operational efficiency, and genuine guest engagement for high-end events. Known in hospitality circles as a luxury beverage setup or curated bar display, it functions as both a service hub and a visual anchor for your event space. The difference between a forgettable drink table and a station guests photograph comes down to four decisions: layout, glassware, lighting, and logistics. Get those right, and your elegant drink display becomes the most talked-about detail of the night.
How to set up an upscale drink station with zone layouts
The most effective approach to setting up an upscale drink station is dividing it into distinct drink zones rather than crowding every option onto one surface. Zone-based setups calm traffic and speed service by distributing guests across drink categories. That single shift prevents the bottleneck that turns a premium bar into a chaotic mess.
A standard luxury beverage setup uses four zones: whites and rosé on ice, reds at room temperature, a signature cocktail or punch dispenser, and a dedicated non-alcoholic corner. Each zone handles its own traffic stream, so guests who want sparkling water never compete with guests building a cocktail. Staging geometry should align with natural guest movement, with menus placed where guests pause and garnishes physically separated from glassware to reduce clutter.
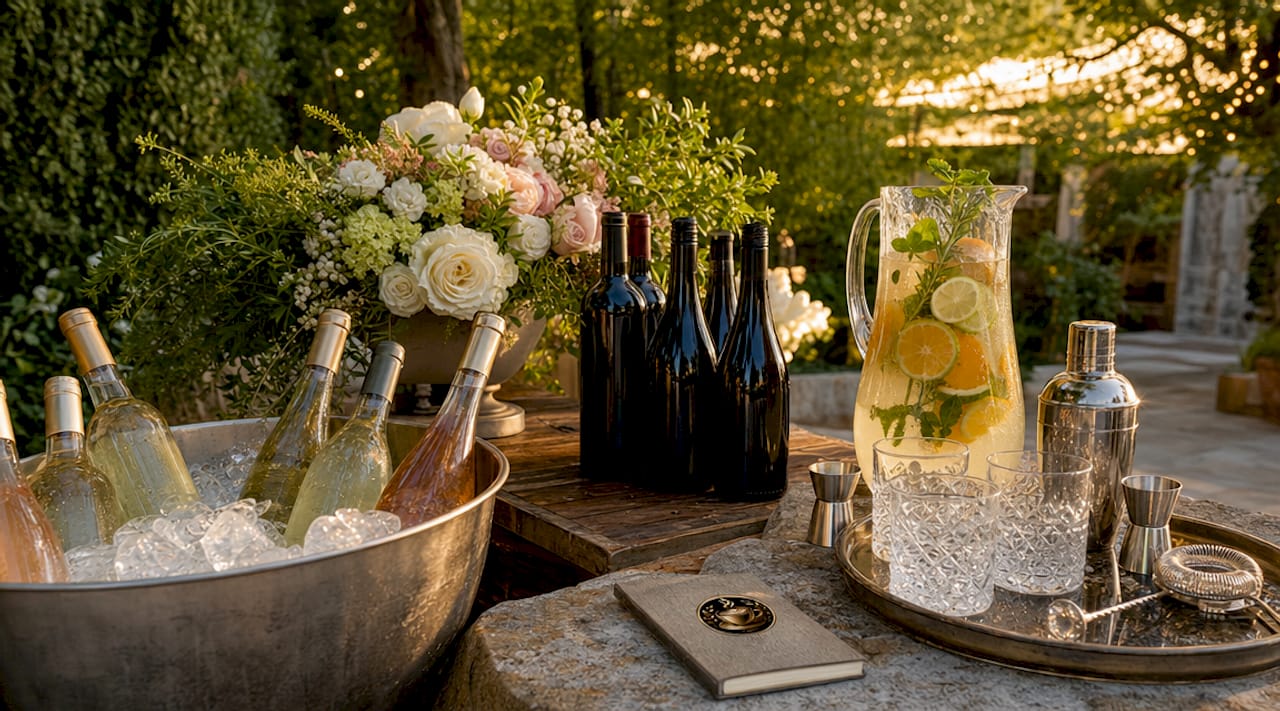
Location matters as much as layout. Place the station away from the main seating cluster but close enough that guests do not feel exiled to a corner. A rectangular table works for intimate gatherings of 20 or fewer; an L-shaped or U-shaped configuration handles 50 or more guests without creating a single-file line. Leave at least three feet of clearance on the guest-facing side so two people can stand side by side without blocking traffic.
Pro Tip: Print small zone menu cards and prop them in brass or acrylic holders at each station. Guests read them while waiting, which reduces questions and keeps the flow moving.
| Layout type | Best for | Key advantage |
|---|---|---|
| Linear (single table) | Intimate gatherings under 25 guests | Simple to set up and style |
| L-shaped | Mid-size events of 25 to 60 guests | Separates alcoholic and non-alcoholic zones naturally |
| U-shaped | Large events over 60 guests | Maximum zone separation and traffic distribution |
| Dual-station | Weddings and corporate events | Eliminates single-point congestion entirely |
What glassware and tools does a refined drink station require?
Glassware is the single most visible signal of quality at any premium drink bar. Crystal and premium glass communicate care and intention in a way that plastic or standard rental ware never can. A thin-walled wine glass or a hand-blown rocks glass tells guests they are at an event where details were considered.
The standard rule is one glass per guest per drink category, plus a 20 percent buffer. Double your glassware inventory to avoid shortages, since guests set glasses down, forget them, and return for a second pour. Running out of clean glasses is the fastest way to undermine an otherwise polished setup. Store backup glasses in a nearby cabinet or on a lower shelf, not in a box in another room.
Beyond glassware, the tools you stage on the surface define whether the station feels curated or improvised. A cocktail shaker, a jigger, a long bar spoon, and a muddler cover the core DIY cocktail station needs. Arrange them on a small tray or slate board so they read as intentional rather than scattered. Label every mixer, syrup, and garnish with small cards. Clear labeling makes the bar feel curated and reduces host stress during the event.
Pro Tip: Consult hospitality drinkware selection tips before purchasing to match glass shape to drink category. A Burgundy glass for a Pinot Noir and a Nick and Nora for a martini signal expertise that guests notice even if they cannot name why.
Must-have components for a premium drink station:
- Wine glasses (red and white), rocks glasses, highball glasses, and coupes or Nick and Nora glasses
- Cocktail shaker, jigger, bar spoon, muddler, and strainer
- Ice bucket with tongs plus a separate scoop for bulk ice
- Labeled mixers, syrups, and bitters in matching bottles or decanters
- Fresh garnishes in small ceramic or glass dishes: citrus wheels, herbs, olives, and cocktail picks
- Linen cocktail napkins in a color that matches your event palette
- Drink markers or charms for stemware identification
How does lighting transform a drink station into an event focal point?
Lighting is the detail most hosts plan last and should plan first. Warm lighting at 2700 to 3000K deepens wood tones, makes brass hardware glow, and turns a marble surface into something that looks designed rather than assembled. The difference between a well-lit station and a poorly lit one is visible in every guest photo taken that evening.
Battery-powered LED lighting at 2700K offers flexibility without running extension cords across a venue floor. Place LED strips under the bar counter edge or behind glass shelving to create a soft glow that highlights your glassware from below. Integrated under-counter lighting on multiple sides creates depth and makes even a simple setup look architectural.
Material choices amplify lighting effects. Marble, polished brass, and light wood all catch warm light and reflect it back into the space. Dark matte surfaces absorb light and flatten the visual impact. If your table is dark, layer a white or ivory linen underneath your decorative elements to bounce light upward.
Decorative and lighting checklist:
- Warm LED strips or battery-powered accent lamps at 2700 to 3000K
- Glass or acrylic shelving to display bottles and glassware at height
- Fresh florals or greenery in low vessels that do not block sightlines
- Linen runner or tablecloth in a neutral or event-matched color
- Printed or hand-lettered signage in frames that match your decor theme
- Candles or flameless LED candles for table-level warmth
- Test all lighting at the actual event time of day before guests arrive
What operational logistics keep a drink station running smoothly?
Operational failures at a drink station are almost always ice failures. Multiple coolers and clear replenishment ownership prevent service delays that no amount of beautiful glassware can recover from. Use one cooler for guest-facing ice, one for chilling bottles, and a third bulk reserve kept out of sight. Never let guests dig through a single shared cooler.
Build the station two to three hours before the event, add ice 90 minutes prior, and stage garnishes 45 to 60 minutes before guests arrive. This sequence matters because garnishes cut too early will oxidize and wilt, and ice added too early melts before service begins. Keep the surface clean and reset between the setup phase and guest arrival so the station looks untouched when the first guest approaches.
Signage and designated helpers reduce bottlenecks and maintain the station’s appearance throughout the event. Assign one person specifically to trash removal and restocking, not as a secondary task but as their primary role. A cluttered surface with empty bottles and used napkins signals neglect faster than any other detail.
Pro Tip: Tuck coolers and bulk ice storage under the bar or at the base before decorating the top surface. Building from the bottom up prevents a rushed appearance and keeps chilled capacity intact without disrupting your display.
Operational timing steps:
- Two to three hours before: assemble all furniture, shelving, and structural elements
- Ninety minutes before: load ice into all coolers and chill bottles
- Forty-five to sixty minutes before: stage garnishes, label mixers, arrange glassware
- Thirty minutes before: test all lighting and adjust any display elements
- Fifteen minutes before: final surface reset and trash removal
- During the event: assign one helper to restock and clear every 30 minutes
How do you tailor your drink station to different event types?
A luxury beverage setup for an intimate dinner party of 12 looks nothing like the one you build for a 150-person wedding reception, and it should not. Scale your station to your guest count and venue size first, then layer in theme and seasonal choices. Trying to run a single-table setup for 80 guests creates lines that no zone signage can fix.
Outdoor events require specific adjustments that indoor setups do not. Direct sun degrades garnishes and warms white wine within 20 minutes. Use a tent, pergola, or large umbrella over the station, and keep a dedicated cooler for whites and rosé that guests do not access directly. Wind protection matters too: weighted menu cards, covered garnish dishes, and secured linens prevent the kind of chaos that reads as disorganized regardless of how beautiful the setup was at the start.
For weddings and corporate gatherings, theme coordination between the drink station and the broader event decor signals intentionality. A garden wedding calls for botanical garnishes, copper vessels, and linen in sage or blush. A corporate cocktail hour reads better with clean lines, monochrome glassware, and branded signage. Seasonal drink choices reinforce the theme: a warm spiced punch station in November, a cucumber-mint agua fresca station in July.
Pro Tip: Place non-alcoholic options at the most visible and accessible point of the station, not tucked at the end. Guests who do not drink alcohol should never feel like an afterthought, and a beautifully presented sparkling water or house-made shrub station signals that you planned for everyone.
Key takeaways
A well-executed upscale drink station requires zone planning, premium glassware, warm lighting, and a timed operational sequence to deliver a guest experience that feels effortless.
| Point | Details |
|---|---|
| Zone layout is non-negotiable | Divide the station into four zones to distribute traffic and speed service. |
| Glassware signals quality instantly | Use crystal or premium glass with a 20 percent buffer to prevent shortages. |
| Lighting at 2700 to 3000K transforms materials | Warm LED lighting makes marble, brass, and wood look intentional and designed. |
| Ice management prevents service failure | Run three separate ice supplies: guest-facing, bottle-chilling, and bulk reserve. |
| Timing the setup sequence matters | Build two to three hours early, add ice at 90 minutes, stage garnishes at 45 minutes. |
Why the details you almost skip are the ones guests remember most
I have seen beautifully styled drink stations fall apart within the first 30 minutes of an event, and the culprit is almost never the drinks. It is the details that hosts deprioritize because they seem minor: a single ice cooler that runs dry, garnish dishes with no labels, glassware stored in a box under the table instead of staged and ready. Guests do not consciously notice these things. They just feel that something is off, and that feeling sticks.
What I find consistently true is that the stations guests remember are the ones where someone clearly thought about the experience from the guest’s perspective, not just the host’s. Where do I stand? What do I pick up first? Where does the garnish go? A pour-and-garnish flow with a simple menu card answers all three questions before a guest even has to ask.
The other thing most hosts underestimate is how much lighting does. I have watched the same glassware collection look ordinary under overhead fluorescents and genuinely stunning under 2700K warm LEDs. If you invest in one thing beyond the drinks themselves, make it the lighting. It costs less than a case of wine and changes everything about how the station reads in person and in photographs.
My honest advice: plan the operation before you plan the aesthetics. Lock in your ice strategy, your replenishment rotation, and your timing sequence first. Then build the beautiful display on top of that foundation. The elegance holds all night when the logistics are solid underneath it.
— Sharbel
Build your station with the right glassware from Thegildedcup
The glassware you choose is the first thing guests see and the last thing they set down. Thegildedcup carries a curated selection of luxury drinkware collections designed specifically for upscale events and home bar setups, from hand-blown crystal wine glasses to precision-cut rocks glasses and artisan coupes. Each piece is selected for both visual impact and practical durability, so your station looks polished through the first pour and the last. If you want to explore what the right glass does for a premium drink bar, the home bar accessories guide at Thegildedcup is a strong starting point for building your full setup.
FAQ
What is an upscale drink station?
An upscale drink station is a self-serve beverage display designed to combine elegant presentation with operational efficiency for high-end events. It typically includes premium glassware, labeled mixers, fresh garnishes, and a zone-based layout that guides guests through the drink-building process.
How many drink zones should a luxury beverage setup include?
Most upscale setups use four zones: chilled whites and rosé, reds at room temperature, a signature cocktail or punch dispenser, and a non-alcoholic corner. This distribution reduces congestion and gives every guest a clear destination.
When should you set up a drink station before an event?
Build the structural elements two to three hours before the event, add ice 90 minutes prior, and stage garnishes 45 to 60 minutes before guests arrive. This sequence keeps garnishes fresh and ice from melting before service begins.
What glassware is required for a premium drink station?
A well-stocked station needs wine glasses in red and white sizes, rocks glasses, highball glasses, and coupes or Nick and Nora glasses, with a 20 percent overage above your guest count to prevent shortages during the event.
How do you keep a drink station looking polished throughout the event?
Assign one dedicated helper to restock supplies and remove trash every 30 minutes. Separate guest-facing ice from bulk reserve ice, and reset the surface before guests arrive so the station looks untouched at the start of service.
Recommended
- Step-by-step cocktail serving: master elegant presentation - The – The Gilded Cup
- Hospitality Drinkware Selection Tips for Professionals – The Gilded Cup
- Elevate Your Home Bar: 12 Must-Have Luxury Accessories - The Gilded – The Gilded Cup
- Hospitality Drinkware Trends 2026: Top 7 to Know – The Gilded Cup